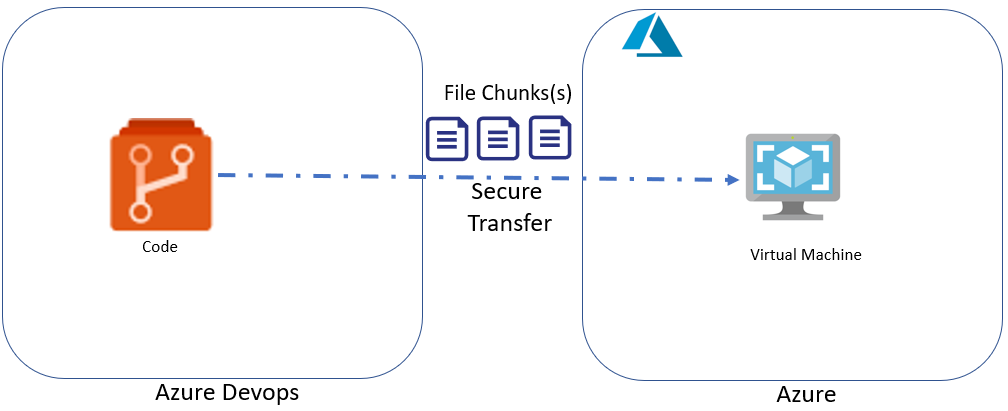
Secure file transfer of files from Azure Devops to Azure Virtual Machine
In this article I would discuss a few different scenarios, requirements for transferring files from a code repository, local machine, Azure Devops repo to an Azure VM. Before we begin let me specify a few conditions to start with
1. Assume the file is not available publicly, holds important data.
2. Assume the Azure Virtual Machine is not allowed to connect to internet and fetch the files
We will add more conditions and scenarios as we go long. Please note that there may be many other ways to securely transfer files to Azure virtual machines and I have just covered a few.
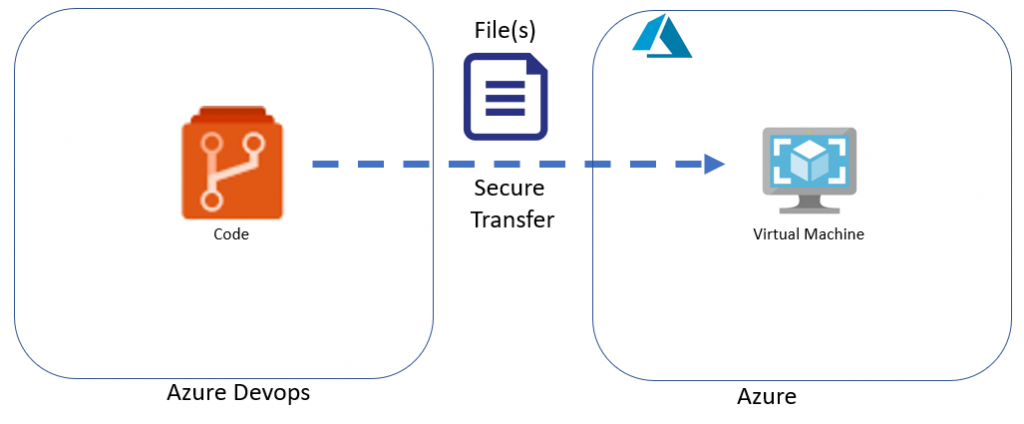
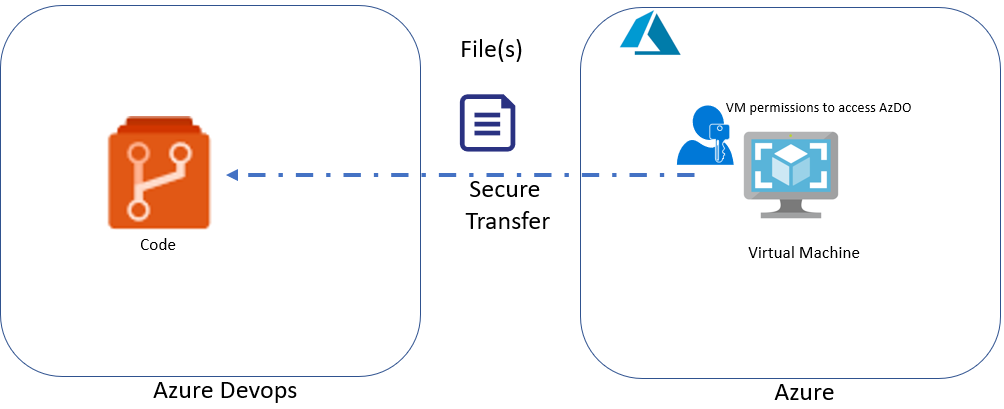
Method 1: Running code on the VM to go out and get the file
We can run code against the VM using Invoke-azVMRunCommand to fetch the files from within the VM. This has a few requirements such as allowing access in the VM, setting up NSG rules to allow VM to go out and get the files from public internet site. Assuming the VM does not have access to the internet this option is not feasible. Also if the file contains secure data it may not be feasible to make the file publicly available. It could also mean setting permissions in the VM to connect to Azure Devops if the files are in Azure Devops repo.
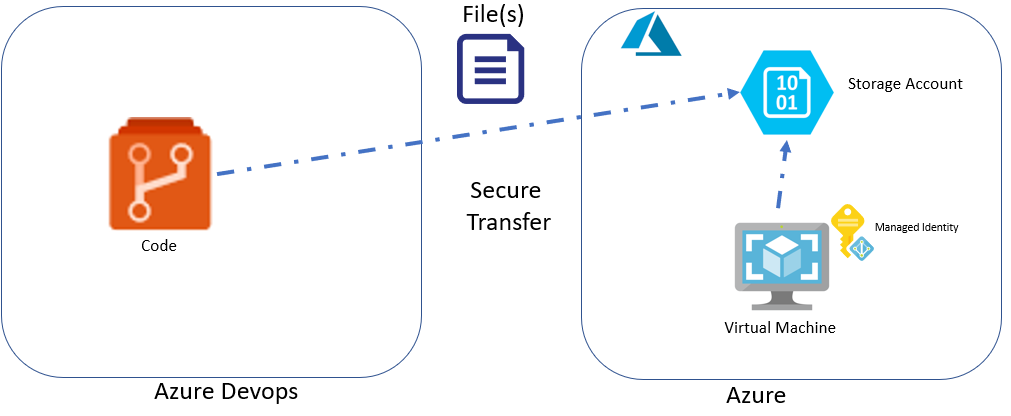
Method 2: Using a Managed Identity and Storage Account
This method needs the files to be dropped into an Azure Storage Account and assigning a Managed Identity for Virtual Machine which has permissions on the Storage Account to access the file. We can then run a command against the VM that can go out to the storage account and fetch the files.
This method works for large files, certificates, etc. However requires a managed identity and does require a VM to have access to the storage account and virtual network settings to be able to access the virtual Machine. You can create and remove the managed identity in the code but the disadvantage of this method is the managed identity itself. In certain environments you may not have privileges to create a managed identity or the security team may not like the idea of assigning the VM a managed identity that could make the VM access the storage account.
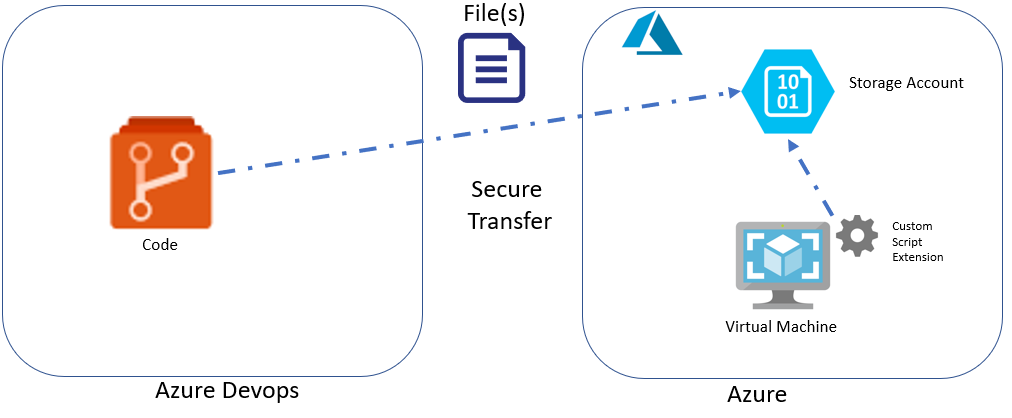
Method 3: Using Custom script extension
Azure allows you to deploy custom script extensions which basically drops the specified files from an accessible location to the VM and then run one of the dropped files to run as a script. This works great for both Windows and Linus machines. Reference documentation from Microsoft can be found here for Windows and here for Linux VM’s. You can use it to simply drop files into a VM, execute the script to handle take certain action such as installing the MSI packages, install certificates, change registry settings. Once the job is done you can remove the custom script extension after cleaning up the files. Although this method des not require a managed Identity for the VM. Downside is that this also requires a location which is accessible to the VM. You will need to transfer the files to a Storage Account first and then use the custom script extension to transfer the files to the VM. I have used this method for medium sized files
Method 4: Terraform File provisioner
Terraform is another tool that makes it easy to replace the ARM templates and generate declarative code to provision resources to not only Azure but other cloud environments. You can use the Terraform File provisioner to transfer files to windows using the WinRM and linus using the SSH. However the limitation is the access to the VM over a public endpoint, much like powershell remote
I have done experiments with New-PSSession and powershell command and used it to transfer files by reading the raw file, encoding the content into a utf8, and then using the script parameter to transfer the utf8 content to the target remote session and the script running on the remote machine then decodes the utf8 content received as a parameter and saves it into a file with path also passed as a parameter to the remote machine. The connection can be secured using SSL but the downside is that this requires the machine to be accessible remotely over a public endpoint which is not desirable in most cases.

Method 5: Directly dropping the file into the VM
This method involves no public IP address, no network settings, No routing, storage account or managed identity. As long as you have the ability to access Azure and have permissions to run the Invoke-azVMRunCommand on the remote machine, you can use this method to transfer files directly from Azure Devops repo to the Azure VM. This works great if you have small and few files that you need to transfer the files. If your files are a bit larger it can break the files into small chunks, and transfer them to the remote machine and assemble them on the remote machine. This is not a recommended way of transferring the files but probably the coolest way I have used to transfer the files to Azure VM’s. Please note that the following code will work only for files containing text. Zip files, exe files, iso and other binary files may be corrupted. There is a separate code I have for transferring such files which is available upon request. In a few cases it has resolved some long standing issues. This is what the code does
1. Reads the file, if the file is larger than X bytes, it breaks the content into chunks of X bytes. We do this since there is a limit of how many characters can be sent to a powershell script as a parameter
2. Encode the chunks into utf8. The reason we do is to avoid any spaces, line breaks etc to cause issues during the transfer as a parameter to the script. You may want to throw a code into convert it into encrypted text but I didn’t have that need since the communication between the VM using Invoke-azVMRunCommand has some basic security already.
3. Run Invoke-azVMRun command against the target VM running a script that decodes the files. The parameter to this script is the file chunk, the file name, target location and a parameter value that specifies if there are more chunks to follow.
The code is available in my GitHub repo at https://github.com/jutlag/CommonFunctions
There are three files for this code
1. Send-FiletoAzureVM.ps1 – This file has all the code that reads the file, encodes and calls invoke-azVMRunCommand against the VM
2. InVMScriptExecution.ps1 – This file is used by the Send-FiletoAzureVM.ps1 to run against a Windows VM to reassemble the chunks and create the file on the target VM.
3. inVMScriptExecution.sh – This is a Bash script that is run against the Linux VM by Send-FiletoAzureVM.ps1 to reassemble the chunks and create the file in the target location
The code is shown below for a ready reference
Send-FiletoAzureVM.ps1
Function Send-FiletoAzureVM{
<#
    .SYNOPSIS
      Send-FiletoAzureVM - Transfers a File and its content directly over to an Azure VM
    .DESCRIPTION
      Send-FiletoAzureVM - Transfers a File and its content directly over to an Azure VM
    .EXAMPLE
    C:\PS> Send-FiletoAzureVM
  #>
  [CmdletBinding()]
  Param (
    # The Azurre Virtual Machine to which the file needs to be trasneferred
    [Parameter(Mandatory = $True)]
    [string]$VMName,
    #Resource Group where the virtual machine exists
    [Parameter(Mandatory = $True)]
    [String]$ResourceGroup,
    #Full path to the file that needs to be transferred
    [Parameter(Mandatory = $True)]
    [String]$File,
    #Path on the target machine where the file needs to be copied
    [Parameter(Mandatory = $True)]
    [String]$TargetPath
  )
process {
        #Check if the source file exists, throw and exit if the file is not found
        if(Test-Path $file){
            Write-Verbose ("File '{0}' found" -f $file)
        }
        else{
            Throw "The file was not found and cannot be transffered to Azure VM"
        }

        #Get the Virtual machine object and its status
        $vmOBJ = Get-azVM -ResourceGroupName $ResourceGroup -Name $VMName -Status -ErrorAction SilentlyContinue

        #If the virtual machine could not be located throw an error and exit
        if($vmOBJ.count -eq 0){
            Throw ("The Virtual Mahine '{0}' does not exist in Resource Group '{1}'" -f $VMName, $ResourceGroup)
        }

        #Check the Status of the Virtuial machine. The file can be transferred only if the powerstate of the VM is running
        $vmStatus = ($vmObj.Statuses | Where-Object {$_.Code -match "Powerstate"}).DisplayStatus

        if($vmStatus -notmatch "running"){
            Write-Warning ("The virtual machine needs to be running. Current Status: '{0}'" -f $vmStatus)
            return
        }

        #Get the virtual machine object this time without status.
        #If the Get-VM is run with -status it gets the status but not the details such as OS Type so we need to run the Get-azVM again
        $vmOBJ2 = Get-azVM -ResourceGroupName $ResourceGroup -Name $VMName -ErrorAction SilentlyContinue

        Write-Verbose $vmOBJ2.OSProfile

        if($vmOBJ2.OSProfile.LinuxConfiguration){
            $TargetOSType = "Linux"
        }

        if($vmOBJ2.OSProfile.WindowsConfiguration){
            $TargetOSType = "Windows"
        }

        #Display verbose message about the OS type discovered
        Write-Verbose ("OS Type {0}" -f $TargetOSType)

        # check target path validity
        $filenameToCheck = $TargetPath

        # get invalid characters and escape them for use with RegEx
        $illegal =[Regex]::Escape(-join [System.Io.Path]::GetInvalidFileNameChars())
        $pattern = "[$illegal]"

        # find illegal characters
        $invalid = [regex]::Matches($filenameToCheck, $pattern, 'IgnoreCase').Value | Sort-Object -Unique

        $hasInvalid = $invalid -ne $null
        if ($hasInvalid){
            #Ignore if target path has / and we are working with Linux path
            if(!($invalid -eq "/") -and ($TargetOSType -match "Linux")){
                throw "Target file path has illegal characters: $invalid"
            }

            #Ignore if target path has : and \ and we are working with Windows path
            if(!(($invalid -contains "\") -and ($invalid -contains ":")) -and ($TargetOSType -match "Windows")){
                throw "Target file path has illegal characters: $invalid"
            }
        }

        #If the target OS is Windows we need to transfer the file in a slightly different way
        if($TargetOSType -match "Windows"){
            #EXtract the file name from the full path
            $fileName = Split-Path $file -Leaf
            #Large files need to be broken down into smaller chunks.
            #Since the command line in powershell cannot hndle more than 8191 characters we will brealk the file in chunk of 5000 chars
            # I am using the chunk size as 5000 to make room for the target path and other data, it is safe to ssume tht the totl payload
            # in most circumstances would be less than 8191 - 5000
            $fileChunkSize = 5000

            #Read the entire file content and convert them to utf8 encoding and BAse 64, this also encodes file contents during transmit
            $content = ([Convert]::ToBase64String([System.Text.Encoding]::utf8.GetBytes((Get-Content -Path $file -Raw -Encoding Default))))

            #The payload handler is a script that must be run inside the target VM to convert the contents back and save them
            $payloadHandler = Join-path -Path "." -ChildPath "InVMScriptExecution.ps1"

            if(!(Test-path -Path $payloadHandler)){
                Throw "Payload handler for Windows VM was not found, it is essential to handle file upload to the VM"
            }

            #Check the Size of the file contents, it is smaller than the chunk size we can send the entire file in one go
            if($content.Length -lt $fileChunkSize){
                Write-Verbose ("File Smaller than {0} bytes" -f $fileChunkSize)

                #The file will not be appended and rather forced to be overwritten on target if Append is set to No
                $Append = "No"

                #Build the parameters to the payload handler so that the file can be creted on the trget
                $runcmdparameters=@{
                                        #Contents that need to be trnsfered to trget VM
                                        "Content" = $content;
                                        #File name on the target machine. It would be the same as on the source machine
                                        "FileName" = $fileName;
                                        # Target machine path where the file needs to be created
                                        "Path" = $TargetPath
                                        #Append mode for the file transfer
                                        "Append" = $Append
                                    }

                #Finally invoke the run command againt the VM to send the payload to the target VM
                Invoke-AzVMRunCommand `
                    -ResourceGroupName $ResourceGroup `
                    -VMName $VMName `
                    -CommandId RunPowerShellScript `
                    -ScriptPath $payloadHandler `
                    -Parameter $runcmdparameters `
                    -Verbose
            }
            else{
                #If the file size is larger than our chunk size, split the contents into multiple chunks and send them one at a time
                Write-Verbose ("File Larger than {0} bytes" -f $fileChunkSize)
                #First chunk will be sending ppend s no to allow the file to be recreated if it already exist
                $Append = "No"

                #Initial counter 0
                $i=0
                while($i -le $content.length-$fileChunkSize){
                    $chunk=$true
                    #Get the content size equal to the file chunk size
                    $contentchunk = $content.substring($i, $fileChunkSize)
                    $runcmdparameters=@{
                                        "Content" = $contentchunk;
                                        #File name on the target machine. It would be the same as on the source machine
                                        "FileName" = $fileName;
                                        # Target machine path where the file needs to be created
                                        "Path" = $TargetPath
                                        #Append mode for the file transfer
                                        "Append" = $Append
                                    }

                    #Send Payload to the target VM
                    Invoke-AzVMRunCommand `
                        -ResourceGroupName $ResourceGroup `
                        -VMName $VMName `
                        -CommandId RunPowerShellScript `
                        -ScriptPath $payloadHandler `
                        -Parameter $runcmdparameters `
                        -Verbose

                    #Increment counter to get the next valid chunk
                    $i += $fileChunkSize

                    #if the file is being sent in chunks all new chunks after the first one should indicate append
                    $Append = "Yes"
                }

                #When the last chunk is remaining it needs to be sent too
                $contentchunk = $content.substring($i)

                $runcmdparameters=@{
                                        "Content" = $contentchunk;
                                        #File name on the target machine. It would be the same as on the source machine
                                        "FileName" = $fileName;
                                        # Target machine path where the file needs to be created
                                        "Path" = $TargetPath
                                        #Append mode for the file transfer
                                        "Append" = $Append
                                    }

                #Send the final chunk
                Invoke-AzVMRunCommand `
                    -ResourceGroupName $ResourceGroup `
                    -VMName $VMName `
                    -CommandId RunPowerShellScript `
                    -ScriptPath $payloadHandler `
                    -Parameter $runcmdparameters `
                    -Verbose
            }
        }

        #If the target VM is a Linux Machine, handle it differently
        if($TargetOSType -match "Linux"){

           #Get the filename from the full file name
           $fileName = Split-Path $file -Leaf

           #Get the raw content from the file
           $rawContent = Get-Content -Path $file -Raw

           #Remove windows style line endings
           $Content = $rawContent.Replace("`r`n","`n")

           #Get the contents as utf8 and convert to Base64, this can be easily handled on the linux side with simple bash commands
           $EncodedText =[Convert]::ToBase64String([System.Text.Encoding]::utf8.GetBytes($Content))

           #This is now the Linux Payload handler file that will read the contents being sent over and construct the file on the other side
           $payloadHandler = Join-path -Path "." -ChildPath "InVMScriptExecution.sh"

           #The payload handler file must exist. throw an error if it doesnt
           if(!(Test-path -Path $payloadHandler)){
                Throw "Payload handler for Windows VM was not found, it is essential to handle file upload to the VM"
           }

           #Create the paremeters for the transfer
           $runcmdparameters = @{
                                    #Contents to be sent over
                                    param1 = $EncodedText;
                                    #File name to be used for the file on the other side
                                    param2 = $fileName;
                                    #Target Path where the file must be created
                                    param3 = $TargetPath
                                }
           #Initiate the run command against the VM and display the result
           $result = Invoke-AzVMRunCommand `
                        -ResourceGroupName $ResourceGroup `
                        -VMName $VMName `
                        -CommandId RunShellScript `
                        -ScriptPath $payloadHandler `
                        -Parameter $runcmdparameters `
                        -Verbose

           Write-Output $result.Value[0].message
        }
    }
}
cls
Send-FiletoAzureVM -VMName templinuxvm -ResourceGroup templinuxrg -File C:\temp\temp2.txt -TargetPath /
InVMScriptExecution.ps1
Param(
  # Recieve the Content from the sender/commandline
  [parameter(Mandatory=$true)][String]$Content,
  # File name for the content to be saved in
  [parameter(Mandatory=$true)][String]$FileName,
  #Path where the file needs to be created
  [parameter(Mandatory=$true)][String]$Path,
  # File needs to be appended or forced overwritten
  [parameter(Mandatory=$false)][String]$Append
)
#Since the Boolean doesnt work very well with parameters from Invoke Command, convert yes/no to true/false
if($append.ToUpper() -eq "YES"){
    $toAppend = $true
}
else{
    $toAppend = $False
}

#Create the full file path to store the conent into
$fileObj = (Join-Path -Path $Path -ChildPath $FileName)

if($toAppend){
    Write-Host "Appending file"
    #Decode and store file content into a previously existing file
    [System.Text.Encoding]::utf8.GetString([System.Convert]::FromBase64String($Content)) | Out-File $fileObj -Append -Encoding default -NoNewline
}
else{
    Write-Host "Forcing file"
    #Decode and store file content into a file, overwrite the file if it already exists
    [System.Text.Encoding]::utf8.GetString([System.Convert]::FromBase64String($Content)) | Out-File $fileObj -Force -Encoding default -NoNewline
}

#Show the directory contents
Dir $path
#Check the target file size
(Get-Item -Path $fileObj).length
inVMScriptExecution.sh
#Recieve the content from the paremeters, decode and store in the target file
echo ${2} | base64 -d >> ${1}
#Copy the file into the desired folder path
cp ${1} ${3}
#List files in current opath
ls
#change directory to the target path
cd ${3}
pwd
#Show the contents of the file in the target path
cat ${1}

echo "Done"